How to Make Professional Dubstep in Magic Music Maker

Contents
Learn how to make professional Dubstep in Magic Music Maker with this easy to follow guide.
Introduction
In this tutorial, you will learn how to make professional dubstep in Magic Music Maker. This software is very user-friendly, and it offers a lot of features that will help you create amazing music. You will also get tips on how to use the different tools in the software to create better music.
What You Will Need
In order to make professional dubstep in Magic Music Maker, you will need the following:
-A computer with an internet connection
-Magic Music Maker software
-Headphones
Once you have gathered all of the necessary materials, you are ready to get started.
Setting Up
Now that you have your dubstep sample pack, it’s time to get started on making some music! The first thing you’ll need to do is set up your software. In this tutorial, we’ll be using Magic Music Maker. If you don’t have it already, you can download it for free here.
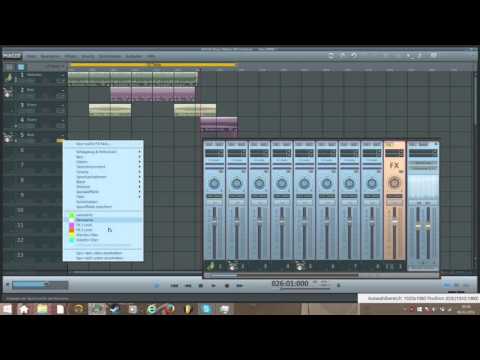
Once you have the software installed, open it up and create a new project. You should see a screen that looks something like this:
In the top left corner, you’ll see a field labeled “Tempo.” This is where you can set the tempo of your song. For dubstep, we recommend a tempo of around 140 beats per minute.
To the right of the Tempo field, you’ll see a field labeled “Time Signature.” This is where you can set the time signature of your song. For dubstep, we recommend a 4/4 time signature.
If everything looks good, go ahead and hit the “Create” button in the bottom right corner of the screen.
Making the Beat
The key to any great dubstep track is a killer beat. You need something that will make people want to move, but that also has enough variation to keep them interested. The best way to make a beat is to start with a simple drum loop and then add in other elements one at a time.
Start by finding a basic drum loop that you like. There are plenty of free ones available online, or you can create your own with a drum machine or samples. Once you have your loop, it’s time to start layering in other sounds.
Start with the basics: a kick, snare, and hi-hat. Add in some percussion if you want, and then experiment with different synth sounds and effects. The sky is the limit here – get creative and see what you can come up with!
Once you have your beat nailed down, it’s time to start working on the drop. This is the part of the song where everything comes together and the bass really kicks in. Start by layering different bass sounds until you find something that you like, and then add in some effects to really make it thump.
Now it’s time to put everything together and add in the final touches. Experiment with different length loops and see what sounds best for your track. You can also add in vocal samples or other sound effects to really give it that professional edge.
When you’re happy with your track, hit render and export it as an .mp3 file so you can share it with the world!
Adding the Bass
Now that you have your drums down, it’s time to add in the backbone of dubstep: the bass. To do this, we’re going to use a software synthesizer called Massive. massive is a powerful synth that can create a huge range of sounds, but for our purposes, we’re just going to focus on creating a simple sub-bass.
Select the bass track in your DAW and insert Massive. For our purposes, we’re just going to use Massive’s default patch, which is a good starting point for creating a sub-bass. In Massive, turn up the “Gain” knob so that the sound is nice and loud, then go to the “Filter” section and turn up the “Cutoff” knob until you get a sound that you like.
Now it’s time to add some movement to our bass sound. In Massive, go to the “Oscillator” section and turn up the “Pitch Envelope” knob. This will give our bass sound a rising pitch effect that will make it stand out more in the mix.
Next, go to the “Amp Envelope” section and turn up the “Attack” knob. This will make our bass sound more aggressive and provide a nice contrast to the drums we added earlier.
Finally, go to the “Effects” section and turn on both the “Reverb” and “Delay.” Reverb will add some depth and space to our sound, while delay will add some echo. Both of these effects will help make our bass sound bigger and more powerful.
Adding the Lead
Now that you have your basic melody, it’s time to add a lead. A lead is a higher-pitched melody that stands out against the rest of the music. It’s what will make people remember your song.
There are two ways to add a lead in Magic Music Maker. You can either use the Lead tool, or you can record your own lead using a MIDI keyboard.
To use the Lead tool, select the Lead icon from the toolbar on the left side of the screen. Then, click and drag across the grid to create your lead. You can edit the pitch, volume, and length of each note by clicking on it and making changes in the Note Properties window.
To record your own lead, first connect a MIDI keyboard to your computer. Then, click on the Recordbutton and select “MIDI.” Choose your keyboard from the drop-down menu and press “Record.” Now, play your lead melody into the keyboard. When you’re finished, press “Stop” to stop recording.
Finishing Up
Now that you have your beat, bassline, and melody, it’s time to add some final touches. In this section we’ll add some effects to our track to make it sound more professional. We’ll also talk about how to export your track so you can share it with your friends.
Conclusion
In conclusion, Magic Music Maker is a powerful tool that can help you create professional dubstep music. With a little practice, you can use it to make great tracks that will get people moving. Thanks for reading and good luck with your music making!