How to Play Electronic Music with Piano Hand Gloves
Contents
How to Play Electronic Music with Piano Hand Gloves – A guide to using gloves to play electronic music.
Introduction
Have you ever watched a musician play the piano and wished you could do the same? Well, now you can with piano hand gloves! These gloves allow you to play electronic music by simply tapping your fingers on any surface. Whether you want to play the piano, drums, or other instruments, these gloves make it possible.
What You Will Need
In order to play electronic music with piano hand gloves, you will need the following:
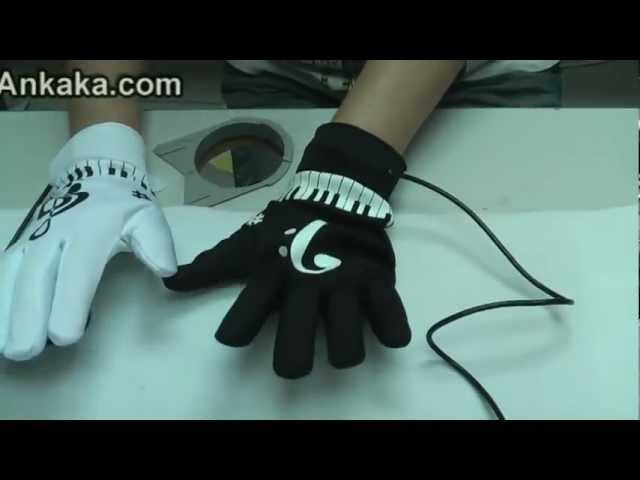
-1 pair of long white cotton gloves
-1 pair of black latex gloves
-1 can of Conductive Finger Paint
-1 roll of clear packing tape
-1 set of alligator clip leads
Instructions:
1. Put on the long white cotton gloves. These will keep your hands clean while you are working.
2. Put on the black latex gloves over the top of the cotton gloves. These will act as a barrier between your skin and the conductive paint.
3. Use the conductive finger paint to paint a thin layer over the tips of all 10 fingers on both hands. Be sure to cover the entire area of each finger, but do not make the layer too thick. Allow the paint to dry completely before continuing. 4. Once the paint is dry, use the packing tape to create a “piano keyboard” on each hand. Start at the base of your palm and wrap the tape around your hand until you reach your fingers. Place one strip of tape horizontally across your fingers, making sure that each finger is covered by a separate strip of tape. Then, wrap another strip of tape around your hand, this time going vertically across your fingers so that each finger is covered by two strips of tape (one horizontal and one vertical). 5. Finally, use the alligator clip leads to connect each “key” on your piano keyboard gloves to an electronic instrument (synthesizer, drum machine, etc.). You can use any type of lead – banana plug cables, 1/4” patch cables, or even bare wire – as long as it can be connected to both your gloves and your instrument.
6. Now you’re ready to play! Each time you touch a “key” on your glove keyboard, an electric current will flow from your glove into the lead and trigger a sound from your instrument. Experiment with different combinations of sounds to create unique music!
Step One: Choose Your Gloves
When you’re picking out your gloves, it’s important to make sure that they fit snugly and that the fingers are long enough to reach all the keys on your keyboard. You don’t want them to be too loose, or else they’ll slide around and interfere with your playing.
Once you have your gloves, the next step is to set up your electronic keyboard. If you have an acoustic piano, that’s fine too – you can use piano hand gloves with any type of piano.
##Heading:Step Two: Set up Your Keyboard
##Expansion:Now that you have your gloves, the next step is to set up your electronic keyboard. If you have an acoustic piano, that’s fine too – you can use piano hand gloves with any type of piano.
To set up your keyboard, you’ll need to connect it to a power source and then connect it to either a computer or an amplifier. Once it’s all set up, turn on the power and test out the keys to make sure they all work.
##Heading:Step Three: Put on Your Gloves
##Expansion:Now that your keyboard is all set up, it’s time to put on your gloves! Start by putting them on like you would any other type of glove, making sure that the fingers are aligned with the keys. Once they’re on, adjust the fit so that they’re snug but not too tight – you should be able to move your fingers freely.
##Heading:Step Four: Start Playing!
##Expansion:Now that you have your gloves on, it’s time to start playing! Experiment with different sounds and rhythms, and see what kinds of music you can create. Remember – there are no rules when it comes to making music, so let your creativity flow!
Step Two: Set Up Your MIDI Controller
Now that you have your gloves, it’s time to set up your MIDI controller. If you don’t have a MIDI controller, you can use any piano keyboard or even your computer’s keyboard as a MIDI controller. To do this, you’ll need to install a Virtual MIDI Piano Keyboard (VMPK) on your computer. Once you have VMPK installed, open it and select your computer’s keyboard as the input device.
Now that your MIDI controller is set up, it’s time to put on your gloves! Make sure that the glove sensors are placed on the correct fingers – the thumb, index finger, and middle finger of each hand. Once the gloves are on, you should see the LED lights on the gloves light up. If they don’t, make sure that the batteries are properly installed and that the power switch is turned on.
Now you’re ready to start playing music! When you press a key on your MIDI controller, you should see the corresponding LED light up on your glove. When you play a note, the sound will come from whichever virtual instrument or sound source you have selected in your DAW or VMPK.
Step Three: Calibrate Your Gloves
There are a few ways to calibrate your gloves. One way is to use the calibration software that came with your gloves. This usually involves holding your hands in front of a webcam or another type of sensor and following on-screen instructions.
Another way to calibrate your gloves is to use a MIDI controller. To do this, you’ll need to connect your gloves to the controller using a MIDI cable. Once you’ve done this, you can use the controller’s buttons, knobs, and faders to calibrate your gloves.
Once you’ve calibrated your gloves, you’re ready to start playing electronic music!
Step Four: Don the Gloves
Now that you have your gloves, it’s time to put them on! Make sure each glove is snug but not too tight. You should be able to move your fingers freely while wearing them. If they are too loose, they will fall off; if they are too tight, you won’t be able to play properly.
Once you have the gloves on, it’s time to start making music! To make a sound, simply press your fingers down on the piano keys. The harder you press, the louder the sound will be. You can also experiment with different dynamics by playing softly or forcefully.
Step Five: Play!
Now that you’ve put on your gloves and made sure they’re snug, you’re ready to play some tunes!
Remember, each finger represents a different note, so you’ll need to press the right keys on the piano to play the notes you want. You can also use the gloves to create different sound effects by waving your hands in the air or by tapping on different surfaces. Experiment and have fun!
Conclusion
As you can see, playing electronic music with piano hand gloves is a fun and easy way to get into the music-making spirit! Whether you want to use them to create your own beats or simply to play along with your favorite songs, these gloves are a great way to get started.