How to Use Microsoft Project to Plan Your Next Music Video

Contents
If you are in the music industry, you know that planning and executing a music video can be a daunting task. In this blog post, we will show you how to use Microsoft Project to plan your next music video production.
Introduction
Microsoft Project is a powerful project management tool that can be used for a variety of projects, including music videos. In this article, we’ll show you how to use Microsoft Project to plan your next music video.
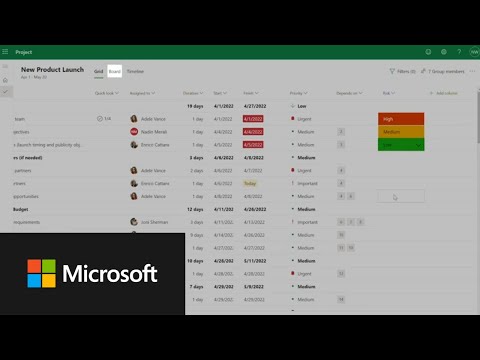
Microsoft Project can be used to track tasks, resources, and milestones for your project. You can use it to create a Gantt chart, which is a visual representation of your project timeline. You can also use Microsoft Project to create task lists, resource lists, and other project-related information.
When planning your music video, you’ll need to consider a variety of factors, including the length of the video, the number of shots, the locations, the cast and crew, and the equipment. You can use Microsoft Project to track all of this information and more.
Once you have all of your information entered into Microsoft Project, you can then start creating your project timeline. This timeline will help you determine when each task needs to be completed and who is responsible for each task.
With Microsoft Project, you can also add additional information to each task, such as notes and attachments. This additional information can be helpful when you’re working on your music video and need to reference something specific.
Once you’ve created your project timeline, you can then start working on your music video. As you work on your video, you can update your timeline accordingly. This will help ensure that everything stays on track and that your video turns out exactly how you want it.
What is Microsoft Project?
Microsoft Project is a project management software program developed and published by Microsoft. The software is designed to assist a project manager in developing a schedule, assigning resources to tasks, tracking progress, managing the budget, and analyzing workloads.
Microsoft Project was first released in 1984 for MS-DOS and was later ported to Microsoft Windows. The latest version of Microsoft Project is included in the Microsoft 365 suite of applications and services.
How to Use Microsoft Project for Your Next Music Video
Microsoft Project can help you plan your next music video by helping you to keep track of all the tasks that need to be completed. You can create a timeline of all the tasks, assign responsibility to team members, and track the progress of the project. This will help you to ensure that the project is completed on time and within budget.
Step 1: Choose Your Project Type
Microsoft Project has a variety of project types available, each with its own set of features and functionality. When choosing a project type, you’ll want to consider the nature of your project and what kind of features and functionality you’ll need. For example, if you’re planning a music video, you might want to choose a project type that includes timelines and task lists.
Once you’ve chosen a project type, you can get started by creating a new project file. To do this, simply open Microsoft Project and select the “New” option from the File menu. Then, choose the appropriate project type from the list of available options.
Step 2: Choose Your Template
Now that you know what you need to do in order to plan your next music video project using Microsoft Project, it’s time to pick the right template.
If you scroll down the “Choose a template” page, you will see that there are many different options for templates that you can use. If you are planning a project that is similar to another project that you have completed in the past, then it might make sense to use the same template so that everything is consistent.
However, if this is your first time using Microsoft Project or if your project is significantly different from anything you have done before, then it might be a good idea to choose a template that is specifically designed for music videos.
One option is the “Music Video Production Schedule” template, which was created by Microsoft and can be found by clicking on the “Creative” category. This template has pre-built tasks and resources that are specific to music video production, which means that it can save you a lot of time when compared to starting from scratch.
Once you have found the template that you want to use, simply click on the “Create” button and Microsoft Project will launch with your selected template ready to go.
Step 3: Set Up Your Project
Now that you have an idea of what you need and when you need it, you can set up your project in Microsoft Project. If you’ve never used Project before, don’t worry – it’s easy to get started.
1. Open Microsoft Project. If you don’t have it installed on your computer, you can download a free trial from the Microsoft website.
2. Create a new project by clicking the “File” menu and selecting “New.”
3. Enter the name of your project in the “File Name” field and click “Save.”
4. To add tasks to your project, click the “Task” menu and select “New Task.”
5. Enter the name of the task and click “OK.”
6. To add subtasks, click the “Task” menu and select “New Subtask.”
7. Enter the name of the subtask and click “OK.”
8. To add start and due dates for tasks, double-click on the task or subtask and enter the information in the “Start Date” and “Due Date” fields.
9. To assign resources to tasks, double-click on the task or subtask and click the “Resources” tab. Click “Add Resource” and select the resource from the list. You can also assign cost information for each resource by clicking the “Costs” tab and entering data in the appropriate fields.
10. To track progress on tasks, double-click on the task or subtask and click the “Progress” tab. Enter information in the “% Complete” field as you complete each task or subtask.
11. To add notes or comments about tasks, double-click on the task or subtask and click ”Notes.”
Conclusion
After you’ve completed your project in Microsoft Project, you can export your project to another software program to complete your music video. This is a convenient way to share your project with other members of your team and get feedback on your work. You can also use this software to create a budget for your music video and track your spending.