How to Make Techno Music with Music Maker 2017 Premium Steam Edition

Contents
Techno music is a genre of electronic dance music that is characterized by a repetitive four on the floor beat and a synthesizer-heavy sound. In this article, we will show you how to make techno music with Music Maker 2017 Premium Steam Edition.
Introduction
Techno is a form of electronic dance music (EDM) that originated in Detroit, Michigan, in the late 1980s. Techno is generally characterized by a repetitive four-on-the-floor beat, a thumping bassline, and synthesizer melodies. If you’re interested in making your own techno music, there are a few things you’ll need to do.
First, you’ll need to find some good quality techno samples or create your own with a Synthesizer. Once you have your samples, you’ll need to create a drum pattern with them. Once you have your drum pattern, you’ll need to add a bassline and some synth melodies. Finally, you can add effects like reverb and delay to give your track more depth and atmosphere.
What You Will Need
To create techno music, you will need a computer with Music Maker 2017 Premium Steam Edition installed, as well as a MIDI controller and an audio interface. You will also need some basic knowledge of music theory and composition.
Step One: Choose Your Tempo
Techno is a genre of electronic music that emerged in the late 1980s. It is characterized by a repetitive four on the floor beat and often has a fast tempo. If you’re new to making techno, it’s important to choose the right tempo for your song. The tempo should be between 120 and 150 beats per minute (bpm).
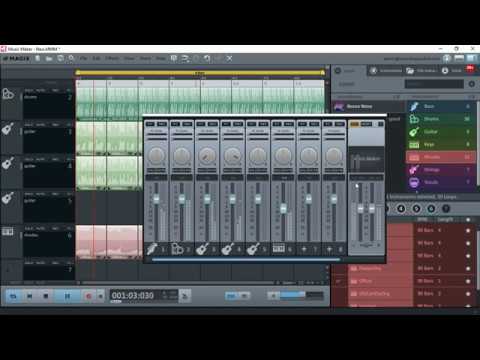
Once you’ve chosen your tempo, it’s time to start layering in some sounds. Techno is typically made with synthesizers, drum machines, and sequencers. In Music Maker 2017 Premium Steam Edition, you have access to over 2,000 different sounds. Start by adding a kick drum on beat one and a snare on beat three.
Step Two: Choose Your Instruments
In the next step, you will need to choose your instruments. You can do this by clicking on the “INSTRUMENTS” tab at the top of the screen. From here, you can browse through the different instrument options and select the ones that you want to use in your techno track. To add an instrument to your track, simply click on it and then click on the “ADD” button. Once you have added all of your desired instruments, you can move on to the next step.
Step Three: Layer Your Sounds
Now that you have your basic beat, it’s time to start layering in some additional sounds. You can do this by adding additional tracks to your project. To do this, click on the “+ Track” button in the lower left-hand corner of the window.
A new track will be added to your project. By default, this track will be set to a drum loop. You can change the instrument for this track by clicking on the down arrow next to the instrument name and selecting a new instrument from the list.
For this example, we’re going to add a hi-hat sound to our beat. To do this, we’ll first need to find a hi-hat sound that we like. You can browse through the available sounds by clicking on the “Sounds” tab at the top of the window.
Once you’ve found a hi-hat sound that you like, drag it onto your new track. You can now adjust the volume and pitch of your hi-hat by using the controls in the lower right-hand corner of the window.
Next, let’s add a snare drum sound to our beat. We’ll repeat the same process that we used for adding the hi-hat sound. First, find a snare drum sound that you like in the “Sounds” tab and then drag it onto your snare drum track.
Now that you have two different sounds playing on two different tracks, you can start to create your own unique techno beat!
Step Four: Add Effects
Now that your track is complete, it’s time to add some effects! In Music Maker, effects are divided into three categories: studio effects, mastering effects and live effects. To add an effect, simply drag and drop it into the track in the arrangement window.
There are endless possibilities when it comes to effects, so we’ll just cover a few of the most commonly used ones here. For more information on all of the available effects, please consult the Music Maker manual.
The first category of effects is studio effects. These are sound-altering effects that can be used on any type of track. The most commonly used studio effect is reverb. Reverb creates a sense of space and can make a track sound larger than life. To add reverb, drag and drop the “Small Room” or “Large Hall” effect into your track.
The next category of effects is mastering effects. These are designed to help balance your track and make it sound its best when played on different types of systems. The most commonly used mastering effect is compression. Compression evens out the dynamics of a track, making the quiet parts louder and the loud parts quieter. This helps prevent your track from sounding jarring or uneven when played on different types of speakers. To add compression, drag and drop the “Optical Compressor” effect into your track.
The last category of effects is live effects. These are designed to be used during live performances to add an extra layer of interactivity and excitement. The most commonly used live effect is looper. Looper allows you to record a section of your performance and play it back on loop while you continue playing over top of it. This creates a layered effect that can really make your performance stand out. To add a looper, drag and drop the “Looper” effect into your track.
Now that you know how to addeffects, experiment with them and see what you can come up with!
Step Five: Export Your Song
Now that your song is complete, it’s time to export it so you can share it with the world. To do this, go to File > Export > Audio. In the window that opens, choose your desired file format and destination for the exported file. Once you’ve made your choices, click “Export” and wait for the process to finish. And that’s it! You’ve now successfully exported your Techno song from Music Maker 2017 Premium Steam Edition.
Conclusion
techno music is very similar to Trance and House music, often characterized by its fast tempo and repetitive nature. If you’re interested in making your own techno tracks, you’ll need a good digital audio workstation (DAW) like Music Maker 2017 Premium Steam Edition. In this program, you can create beats, assemble these into patterns, add effects and vocal samples, and finally mix everything together into a complete track. Let’s take a look at how to do all of this in Music Maker 2017 Premium Steam Edition.