
How to Cut Music on Mac?
Contents
If you’re wondering how to cut music on Mac, you’re in the right place. Check out this step-by-step guide and learn how to do it in no time.

Introduction
If you’re a Mac user, you might be wondering how to cut music on your computer. Luckily, there are a few different ways that you can do this. Here are some of the most popular methods:
iTunes:
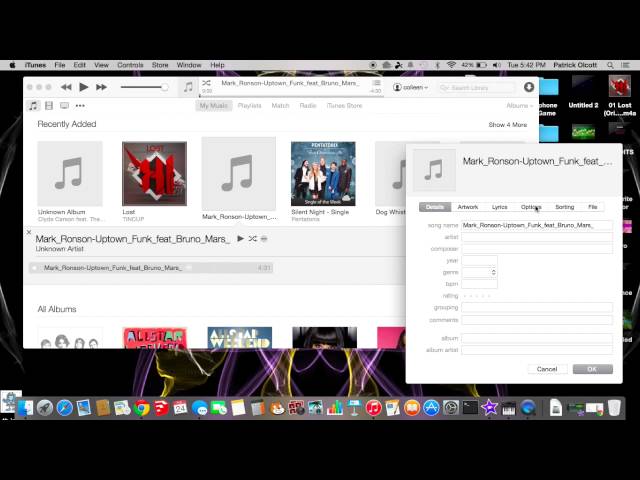
iTunes is probably the most well-known way to cut music on a Mac. To use iTunes, simply open the program and find the song that you want to edit. Then, click on the song and select “Get Info.” From here, you can click on the “Options” tab and select “Start Time” and “Stop Time.” After you’ve made your changes, click “OK” and then “Apply.”
QuickTime Player:
QuickTime Player is another popular option for cutting music on a Mac. To use QuickTime Player, simply open the program and find the song that you want to edit. Then, click on “File” and select “Open File.” Next, find the portion of the song that you want to keep and press “Command+T.” This will create a new track with just the portion of the song that you selected. Finally, press “File” and then “Save.”
GarageBand:
GarageBand is a popular option for cutting music on a Mac because it offers a lot of features and options. To use GarageBand, simply open the program and find the song that you want to edit. Then, click on the track and select “Split.” This will split the track into two parts. Next, find the part of the track that you want to delete and press “Delete.” Finally, press “File” and then “Save.”
How to Cut Music on Mac?
Most music lovers use Macs, and for good reason. They’re powerful, reliable, and easy to use. But what about when you want to edit your music? How do you cut music on Mac?
Fortunately, it’s easy to do. Here’s a quick step-by-step guide:
1. Launch iTunes on your Mac.
2. Select the song you want to edit from your iTunes library.
3. Click on the “Edit” tab at the top of the screen.
4. Find the section of the song you want to cut and select it with your mouse.
5. Press the “Delete” key on your keyboard to remove the selected section of the song.
6. Save your changes by clicking on the “File” menu and selecting “Save.”
That’s all there is to it! With just a few simple steps, you can easily edit your music files on Mac.
The Best Music Cutting Software for Mac
When it comes to music, there are a lot of different ways that you can enjoy it. You can listen to it on the radio, buy CDs, or stream it online. But what if you want to create your own music?
One of the best ways to do this is to use music cutting software. This type of software allows you to take existing songs and cut them up into smaller pieces that you can then use to create your own new songs.
There are a lot of different music cutting software programs available for Mac, but not all of them are created equal. To help you find the best one for your needs, we’ve put together a list of the best music cutting software for Mac.
How to Use the Music Cutting Software for Mac
There are many ways to cut music on Mac, but using a music cutting software is perhaps the most convenient and efficient way to do it. There are many different music cutting software programs available for Mac, so finding the right one for your needs may take some research. Once you have found the perfect music cutting software program for your needs, follow the instructions below to learn how to use it.
The Pros and Cons of Cutting Music on Mac
Apple’s built-in music app, iTunes, has a lot of features. One of those features is the ability to cut songs. You can use iTunes to cut a song down to a certain length or to remove unwanted parts of a song.
There are a few pros and cons to cutting music on Mac. On the plus side, it’s easy to do and you can save your edited songs as separate files. On the downside, you can only edit songs that are in AAC format and you may lose some audio quality when you edit a song.
Here’s how to cut music on Mac using iTunes:
1. Open iTunes and find the song that you want to edit.
2. Right-click on the song and select “Get Info” from the menu that appears.
3. Click on the “Options” tab and select “Start Time” and “Stop Time” from the drop-down menus.
4. Enter the start time and stop time for your edited version of the song.
5. Click on “OK” when you’re finished.
6. Right-click on the song again and select “Create AAC Version” from the menu that appears.
7. iTunes will create a new version of the song with your desired start and stop times.
Tips for Cutting Music on Mac
Most people think of their Mac as a great way to play music, but did you know that you can also use it to cut music? If you’ve ever wanted to create your own ringtones or edit a song for a video project, here are some tips for cutting music on Mac.
– Download a music editing app. There are many different apps available for cutting music, but we recommend using Garageband or Audacity.
– Choose the section of the song you want to use. Use the scrubber tool to find the beginning and end points of the section you want to use.
– Cut the section of the song. Once you’ve found the section you want to use, click on “Edit” and then “Cut” or use the shortcut keys Command + X.
– Save your file. Once you’ve cut your section, click on “File” and then “Save As.” Choose where you want to save your file and give it a name.
How to Convert Music Files on Mac
To convert a music file on Mac, you will need to use a conversion tool. There are many free and paid options available online. We recommend using the free tool “Audacity” for this task.
Here are the steps to convert a music file on Mac:
1. Download and install Audacity from http://www.audacityteam.org/.
2. Launch Audacity and open the music file you wish to convert.
3. Click “File” > “Export as MP3” to launch the Export as MP3 dialogue box.
4. Choose a location to save the file and click “Save”.
5. That’s it! Your music file will be converted and saved as an MP3 file in the location you specified.
It’s easy to share music files on Mac. Here’s how:
1. Open the Music app.
2. Click the Share button .
3. Select how you want to share your music:
-AirDrop: Choose a nearby Mac, iPhone, iPad, or iPod touch user to share with. If you don’t see the person you want to share with, make sure that AirDrop is turned on for both devices, and that you’re within 30 feet (9 meters) of each other. To learn more, see Use AirDrop to share content with other Apple devices.
-Email: Enter one or more email addresses, then click Send. The recipient needs an email account that’s compatible with iCloud Mail.
-Messages: Enter a name or phone number for a contact, then click Send. The recipient needs an iPhone with iMessage turned on, or an iPad that supports iMessage.
4. If asked, enter your Apple ID password to send the message.
How to Organize Music Files on Mac
Method 1: How to Cut Music Files on Mac with QuickTime Player
1. Download, install and launch QuickTime Player on your Mac computer.
2. Go to “File > Open File” on the top menu to select the music file you want to cut. The selected file will be imported and played automatically by QuickTime Player.
3. Set starting point and ending point for the part of music you want to save by dragging the sliding dot on both sides of the playhead. You can also click and hold down the Alt/Option key, then click anywhere on the waveform to set a precise starting or ending point for your selection
4. Once you’ve decided which part of music you’d like to keep, go to “Edit > Trim” on top menu. Or you can right-click (or Control-click) the highlighted part of Waveform area and choose Trim from the drop-down menu that appears.
5.Save your trimmed music file by going to “File > Export As” on top menu (or press Command + E keys together). A new window will pop up, allowing you change file format, quality and name for your new file before saving it onto your Mac computer
Conclusion
Finally, if you want to cut music on Mac, you can use the built-in QuickTime Player. QuickTime Player is a basic video and audio player that comes with every Mac. It can do a lot more than just play media, including trimming video and audio files. To trim a music file with QuickTime Player, follow these steps:
