How to Make Dubstep Music with Magix Music Maker
Contents
Making dubstep music with Magix Music Maker is easy and fun! In this blog post, we’ll show you how to create your own dubstep track using this software.
Introduction
Making dubstep music with Magix Music Maker is easy and fun. You can create your own dubstep tracks with a few simple steps.
First, you need to create a new project in Magix Music Maker. To do this, go to the File menu and click New Project.
Next, you need to add a drum loop to your project. To do this, go to the Insert menu and click Drum Loop.
Once you have added a drum loop to your project, you need to add some basslines. To do this, go to the Insert menu and click Bassline.
Now that you have added a bassline to your project, you need to add some synths. To do this, go to the Insert menu and click Synth.
Finally, you need to add some effects to your project. To do this, go to the Insert menu and click Effects.
When you are finished adding all of the elements of your track, you can save your project by going to the File menu and clicking Save Project.
What You Will Need
In order to make dubstep music with Magix Music Maker, you will need a computer with the software installed, an audio interface, a microphone, and speakers.
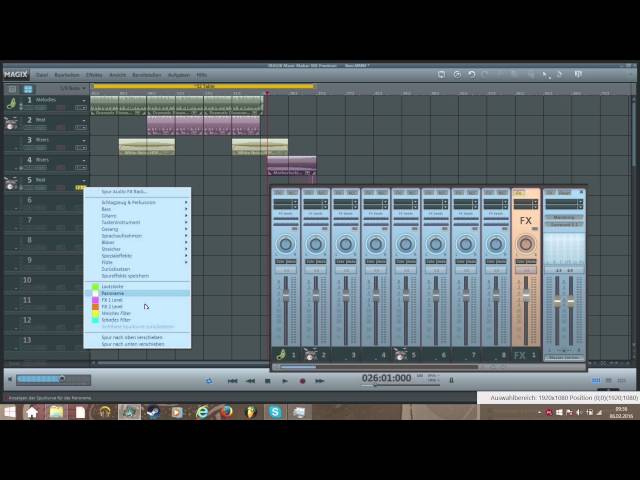
The first step is to open Magix Music Maker and create a new project. Then, you will need to add a drum track by clicking on the ‘Add Track’ button and selecting ‘Drums’ from the list of instruments.
Next, you will need to add a bassline by clicking on the ‘Add Track’ button and selecting ‘Bass’ from the list of instruments.
Once you have added the drum track and bassline, you will need to add a synth lead by clicking on the ‘Add Track’button and selecting ‘Lead Synth’ from the list of instruments.
After you have added the drum track, bassline, and synth lead, you will need to add effects to each of the tracks. To do this, click on the ‘Effects’ button and select an effect from the list.
Finally, when you are finished adding effects, you will need to export your project as an MP3 file by clicking on the ‘File’ menu and selecting ‘Export as MP3’.
Step One – Choose Your Tempo
The first step to making dubstep music with Magix Music Maker is to choose your tempo. Dubstep music is typically between 140 and 150 beats per minute (bpm), so you’ll want to set your project tempo accordingly. You can do this by clicking the “Project Tempo” field in the main toolbar and entering the desired bpm.
Once you’ve set your tempo, it’s time to start adding instruments. For this guide, we’ll be using the default drum kits that come with Magix Music Maker.
Step Two – Add a Drum Loop
Now that you have your track loaded into the program, it’s time to add a drum loop. Dubstep is all about the drums, so you want to make sure that your loop is powerful and hits hard. In Magix Music Maker, there are a few different ways to add a drum loop to your track.
You can either use the “Beat Maker” tool to create your ownloop, or you can browse the library of available loops and drag-and-drop the ones you want to use into your project. For this tutorial, we’re going to use a pre-made loop from the library.
To do this, first make sure that you are in the “Arrange” view of Magix Music Maker. Then, navigate to the “Loop Browser” on the left side of the screen and expand the “Drum Loops” section. Find a loop that you like and drag it into your project.
Step Three – Layer in Some Synth Sounds
Now it’s time to add in some synth sounds. In Magix Music Maker, you can do this by clicking on the “Instruments” tab and then choosing the “Synth” option.
From here, you can experiment with different synth sounds until you find something that you like. Once you’ve found a sound that you want to use, drag it down into the “Loop 1” section of the sequencing window.
Now, find another synth sound that you want to use and drag it down into the “Loop 2” section. Repeat this process for as many synth sounds as you want to use.
Step Four – Create a Bass Line
The last, and arguably most important, element you need to create dubstep is a powerful bass line. This will serve as the foundation for your track, so it’s important to get it right.
There are a few different ways you can go about creating a bass line. The first is to use a synth, like the ones we mentioned earlier. There are a few different presets that you can use to create a dubstep bass sound.
Another way to create a bass line is to use a sample. You can find samples online or in your Magix Music Maker library. Once you’ve found a sample you like, drag it into your track and use the loop tool to loop it.
Once you have your bass line, it’s time to add some effects. A good place to start is with the EQ. Boost the low frequencies and cut the highs to create a really punchy sound. You can also add distortion and other effects to really bring out the power of your bass line.
Step Five – Add Some Effects
Now it’s time to add some effects to your dubstep track. In the ‘Effects’ section of Magix Music Maker, you will find a wide range of different effects that you can add to your track. For dubstep, we recommend using the ‘Growl’, ‘Bass Boost’, and ‘Robot’ effects. To add an effect to your track, simply drag and drop it onto the instrument or vocal part that you want to apply it to.
Once you have added some effects to your track, you can tweak the settings of each effect by double-clicking on it. This will open up a separate window where you can adjust the parameters of the effect. For example, if you want to make the growl effect more pronounced, you can turn up the ‘Drive’ setting. Experiment with different settings until you get the sound that you’re looking for.
Step Six – Export Your Track
Now that your track is complete, it’s time to export it so you can share it with the world. In the File menu, select Export > Export as Audio File.
In the window that appears, give your track a name and choose a location to save it. Then, under Format, select MP3.
Finally, click Export. Your track will now be exported as an MP3 file!